Filtering objects from Azure Active Directory
Microsoft recently made Azure AD Connect generally available and in doing so introduced a method for filtering users based on their membership in a specific group. Unfortunately, this is considered a pilot mode for Azure AD Connect – this means that if you wish to permanently filter objects based on their group membership, you’ll forever be in pilot mode. Another caveat is that you cannot change this group easily. You would need to remove Azure AD Connect and re-install it to select a different group. Indeed if you upgraded from Azure Active Directory Sync Services as I did, this option is completely unavailable to you unless you’re willing to remove and re-install Azure AD Connect.
The reason, as far as I can ascertain, is that there is no attribute of a user object that looks like memberOf on which you can perform some logical decision with the Synchronization Rules Editor.
So how do we filter? There are three methods: Domain, OU and Attribute. In my getting started with Azure Active Directory Sync Services series earlier this year, I showed how to do both of these. The first, Domain, is the obvious one. If you want objects from a domain, you would attach to it during installation. The second, OU, is buried a little deeper inside miisclient.exe but it’s something I’ve demonstrated already in my getting started guide, so I’m not going to cover old ground. The third, Attribute, is what this post is about.
When I say user attribute, what do I mean? These:
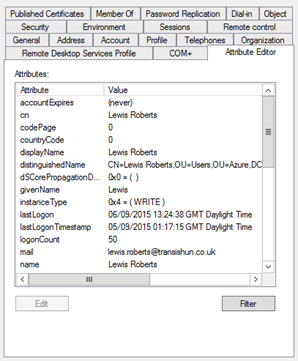
Simply put, we’re able to filter objects that are to be synchronised with Azure AD using these attributes. I’m going to demonstrate how users can be filtered in the following steps and I’m also going to demonstrate a method of using PowerShell in conjunction with the attribute filtering rule to enable the use of group membership to identify who should get an Azure AD account – pseudo group filtering.
Quick Background
I want to point out, this is a testing domain that I use. It isn’t live or used, it’s my lab.
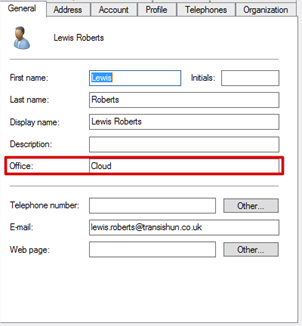
- I have a user (my user object) which I’ve set to have the Office location of Cloud – very original I thought. You could of course use any suitable attribute to store these values. If you have Exchange and you’ve extended the AD domain schema, you’ll have extensionAttribute1 through extensionAttribute15 that you can use. I actually don’t have Exchange in my environment so I don’t have these attributes available to me to tinker with. Anyway, I digress, this is my user account:
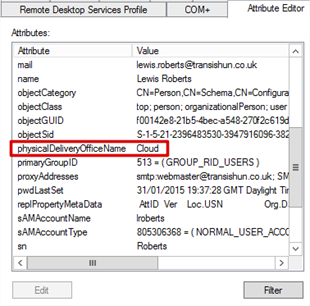
- If I look at the Attribute Editor tab (enable Advanced View to see that), I see that this Office location corresponds to the physicalDeliveryOfficeName attribute. What does setting this attribute do for us? Well, nothing, yet. It just lists this user’s Office location as Cloud in the directory. Again, you don’t have to use this attribute, you can filter on pretty much any but think about how you’re going to achieve that and ensure that the attribute you plan to use isn’t somehow reserved.
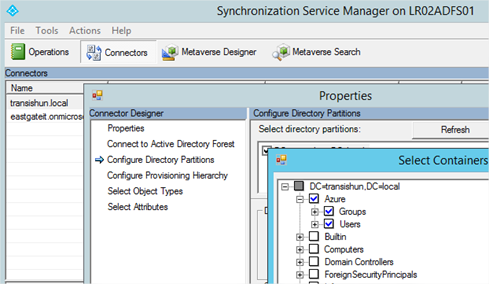
- I’ve shown you before that my AD is already filtered by OU. Anything outside of these OUs are going to be filtered already so, what if I only wanted some user objects inside these OUs to be synced to Azure AD?
- To answer the question, we must configure a Synchronization Rule in the Synchronization Rules Editor which is installed when you install Azure AD Connect. Open it up and you’ll see something like the following:
If you want to know how to install and configure Azure AD Connect, I’ve written an article (although based on Azure AD Sync Services) that should get you up to speed.
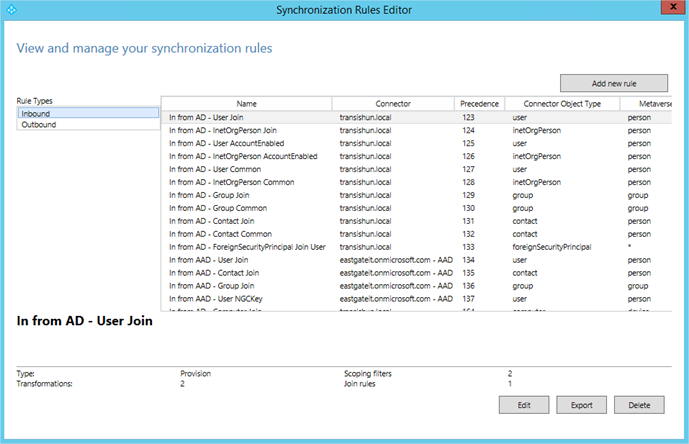
- These rules were configured during installation – yours may differ, it just depends what options you selected during installation. Notice the Precedence column – the rules are applied in a bottom to top manner. The number in the precedence column dictates where the rule will sit in the order (its precedence) – the lower the number, the more important it is. When you create a rule, you will usually create one with a higher precedence (a lower number) than all of the default rules. You must also supply unique precedence numbers for every rule – two rules can’t have the same precedence!
- One other thing – when creating rules, you should only create Inbound rules – the reason is simple. When you upgrade/update Azure AD Connect, Inbound rules are retained between versions and Outbound rules might not be. It’s the might bit that worries me, you would have to check every time. I admit though, sometimes it’s inevitable that you might need to create an Outbound rule, just remember to document it and check it’s still there every time you upgrade Azure AD Connect.

Before tinkering…
WARNING: If you currently have synchronisation working and configured on a schedule, disable the scheduled task. If you make a mistake with your rules, your Azure AD might end up in a bit of a mess. You have been warned.
We’ll go through how we can check our work so you know what’s happening.

Create a rule
In this section we’ll create a new rule that will synchronise only the users who have their Office location (the physicalDeliveryOfficeName attribute) set to Cloud.
- Remembering that my Azure AD Sync is already scoped to just the Azure OU, these are the user objects in the Users OU. Notice that two of them; Lewis Roberts and Kym Jones have their Office location set to Cloud. The third user: Daniel Peplow has no Office location set.

- Before we configure any filter rule, this gives us these user objects in Azure Active Directory. Remember that we are only filtering on OU currently so we get all of them, it’s irrelevant what the Office location is at the moment.

- We’ll now de-provision the Daniel Peplow account from Azure Active Directory by creating a rule that excludes (filters) any user object that does not have their Office location set to Cloud.
- In the Synchronization Rules Editor, click Add New Rule.
-
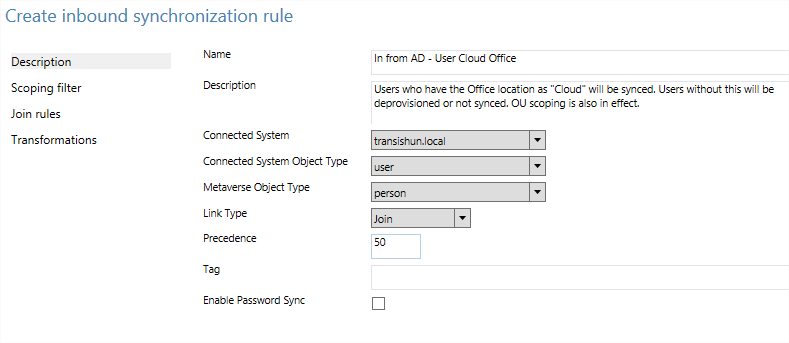
Give the rule a sensible name and description.
- Select your domain from the drop-down next to Connected System.
- Select user from the Connected System Object Type drop-down.
- Select person from the Metaverse Object Type drop-down.
- Select Join from the Link Type drop-down.
- Set the precedence value to a number at least one lower than your current lowest rule. 50 is fine, it gives you some breathing room above and below.
-
Click the Scoping filter tab. Add a group then Add a clause.
- In the Attribute drop-down, select physicalDeliveryOfficeName.
- In the Operator drop-down, select NOTEQUAL.
Why? In essence we are filtering out (we don’t want) users who do not have their Office location set to Cloud.
- In the Value field, enter Cloud.

- Click Next on the Join rules tab – these aren’t used for this rule.
-
On the Transformations tab, click Add transformation.
- On the Flow Type drop-down, select Constant.
- On the Target Attribute drop-down, select cloudFiltered.
This cloudFiltered attribute is what will prevent the users identified by the scoping rule above from being synchronised to the cloud. - In the Source column field, enter true.
- Leave the other settings.

- Finally, click Add to save the new rule and it will be added to your list of rules.
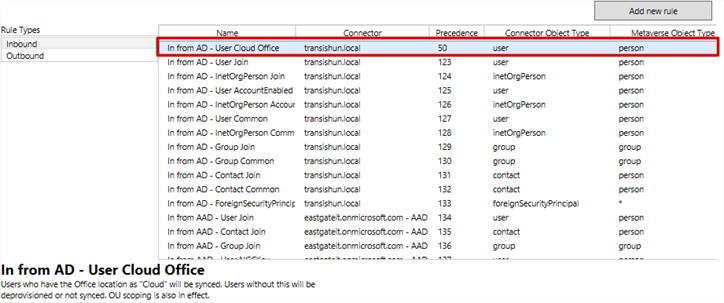
- What did this achieve? – in English, the rule says: cloudFilter any user object in the local Active Directory that does not have the physicalDeliveryOfficeName attribute set to Cloud.
Check your work
It’s good idea to check your work. We want to check that we aren’t going to de-provision everything because of a stupid typo. You did remember to disable thescheduled task didn’t you?
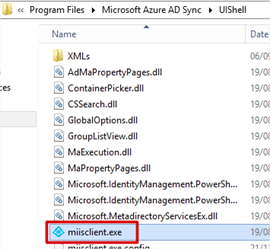
- Navigate to C:\Program Files\Microsoft Azure AD Sync\UIShell and open miisclient.exe
- Navigate to the Connectors tab, select your domain and click Run in the Actions pane.

- Select Full Import and click OK. This initiates an import from the Active Directory.
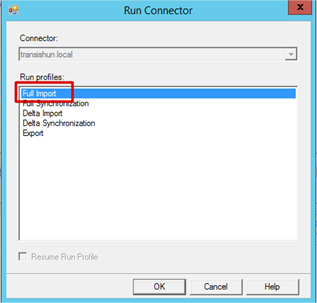
- Not a lot changed of course since all of the users are already in the metaverse. The users will still be imported in to the metaverse.
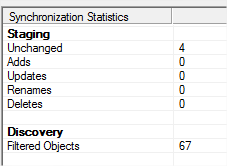
- In the Actions pane, click Run again but this time select Full synchronization. Nothing actually changes in Azure AD – you need to run the Export connector for that – so we can check our work without breaking anything.
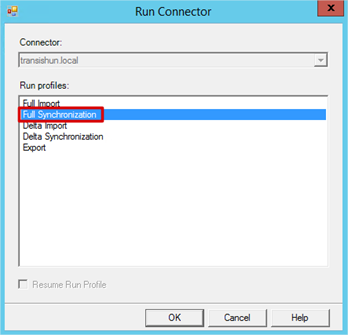
- Once the synchronisation is complete, we can see there are some Provisioning Disconnects for our Azure AD – looks promising. Under Outbound Synchronization, click Provisioning Disconnects.
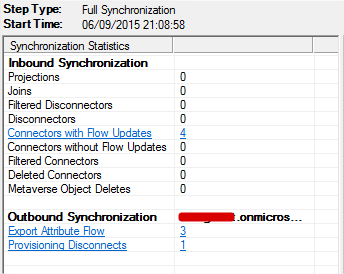
- Select the object from the list and then click the Properties… button.
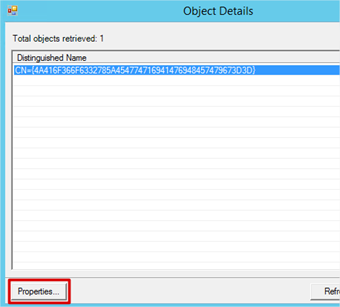
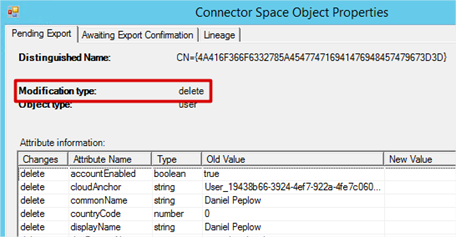
- On the Pending Export tab we can see that the user is Daniel Peplow and the modification type is delete. Looks like he’s going to be deleted from Azure AD and that’s the only object that will be deleted – that’s what we expected.
- Let’s now run the synchronisation schedule manually to make the change in our Azure AD (the scheduled task needs to be enabled first).

- Before the filter was in place, these users were in Azure Active Directory.

- After the rule is in place and the schedule has executed, the user who did not have their Office location set to Cloud is removed from Azure Active Directory.

It is possible to adjust this kind of rule to be used to prevent syncing when first configuring Azure AD Connect. As an example, you could set extensionAttribute9 to contain the text NoSync for users you didn’t want to sync to the cloud. You would create an inbound rule for when extensionAttribute9 EQUALS NoSync to set the cloudFiltered attribute to true. This of course relies on there being an extensionAttribute9 in your Active Directory but without Exchange schema extensions, it won’t exist, so plan ahead.
I’m currently giving some serious thought to developing a solution with PowerShell that can enumerate a group for its members and then set an attribute on each member so that it can be used with synchronisation rules. The challenge is dealing with the user being removed from the group. It would require a script to trigger on membership removal (not possible as far as I’m aware) or a state to be retained (perhaps a shadow group?) between each script execution so the solution can see a difference – the danger there is if the state is somehow lost and the script assumes everyone was removed – that could be nasty.
EDIT: Turns out dealing with the user being removed from the group wasn’t so difficult after I’d thought about using a shadow group. I’ve written the following PowerShell script which does the job of synchronising group membership so that the script knows what changes are made between executions. It is heavily commented and in some cases, pretty verbose. I’ll put the script here and show you some screenshots of the scenarios. Even worst case ones.
|
1 2 3 4 5 6 7 8 9 10 11 12 13 14 15 16 17 18 19 20 21 22 23 24 25 26 27 28 29 30 31 32 33 34 35 36 37 38 39 40 41 42 43 44 45 46 47 48 49 50 51 52 53 54 55 56 57 58 59 60 61 62 63 64 65 66 67 68 69 70 71 72 73 74 75 76 77 78 79 80 81 82 83 84 85 86 87 88 89 90 91 92 93 94 95 96 97 98 99 100 101 102 103 104 105 106 107 108 109 110 111 112 113 114 115 116 117 118 119 120 121 122 123 124 125 126 127 128 129 130 131 132 133 134 135 136 137 138 139 140 |
Import-Module ActiveDirectory -ErrorAction Stop $ErrorActionPreference = "Stop" # The filter group will be the location where you add and remove # users in order to enable or disable them for synchronisation. # It is VITAL you understand that this will have absolutely # ZERO effect unless there's an accompanying synchronization [sic] # rule in place looking to filter on the attribute you're changing. # This script is written with the rule from _this page_ in mind: # http://www.lewisroberts.com/2015/09/06/filtering-objects-from-azure-active-directory/ $FilterGroupName = "Azure-Users" # The filter shadow group is used as a memory or state of # what the filter group looked like at the script's previous execution. # This group is used as a comparison group to understand the changes # made to the filter group since the script's last execution. # Ensure it is communicated that this group should not be edited manually # or be deleted. $FilterShadowGroupName = "Azure-Users-Shadow" # The attribute intended to be changed as a result of a user being added # to the Active Directory $FilterGroupName group. # Again, a Synchronization Rule MUST be configured in order for users # to be filtered using this attribute. If not, changing this attribute # will have ZERO effect in Azure AD. $Attribute = "physicalDeliveryOfficeName" # This is the value you will set on the $Attribute account. This value will be # assigned to the attribute when the user is enabled and it will be set to # $null when the user is disabled. $AttributeEnableValue = "Cloud" # Function Function Process-User { param( [parameter(Mandatory=$true)][string] $User, [parameter(Mandatory=$true)] [ValidateSet( "Enable", "Disable" )] [string] $Action ) If ($Action -eq "Enable") { $EnableUser = Get-ADUser -Identity $User Set-ADUser -Identity $EnableUser -Add @{$Attribute=$AttributeEnableValue} $FilterShadowGroup = Get-ADGroup -Identity $FilterShadowGroupName Add-ADGroupMember -Identity $FilterShadowGroup -Members $EnableUser -Confirm:$false } If ($Action -eq "Disable") { $DisableUser = Get-ADUser -Identity $User Set-ADUser -Identity $DisableUser -Clear $Attribute $FilterShadowGroup = Get-ADGroup -Identity $FilterShadowGroupName Remove-ADGroupMember -Identity $FilterShadowGroup -Members $DisableUser -Confirm:$false } } # Check the groups exist, quit if they don't. Try { Get-ADGroup $FilterGroupName | Out-Null Get-ADGroup $FilterShadowGroupName | Out-Null } Catch { Write-Warning "One or both of the filter group ($FilterGroupName) or shadow group ($FilterShadowGroupName) don't exist. Check that these groups exist!" Break } # We know the groups exist so get the members of the groups $FilterGroupMembers = Get-ADGroupMember -Identity $FilterGroupName $FilterShadowGroupMembers = Get-ADGroupMember -Identity $FilterShadowGroupName # Check members in both groups. Compare-Object doesn't # work if either object are $null. # If both groups are empty, don't do anything. # If $FilterGroupName is empty and $FilterShadowGroupName isn't, disable users and remove them from the shadow group. # If $FilterGroupName has members and $FilterShadowGroupName doesn't, enable the users and add them to the shadow group. If (!$FilterGroupMembers -and !$FilterShadowGroupMembers) { # Both FilterGroup and ShadowGroup are empty, stop execution. Write-Warning "Both groups are empty, nothing to do." Break # Kill script execution, there's nothing to do. } ElseIf (!$FilterGroupMembers -and $FilterShadowGroupMembers) { # There are members in the shadow group, clear them out. Write-Warning "There are members in the shadow group but none in the filter group. Disabling and removing users from the shadow group." Foreach ($User in $FilterShadowGroupMembers) { Write-Host "Disabling: "$User.Name -ForegroundColor Yellow Process-User -User $User.objectGUID -Action Disable } Break # Kill script execution, we've disabled and removed all users from the shadow group. } ElseIf ($FilterGroupMembers -and !$FilterShadowGroupMembers) { Write-Warning "There are members in the filter group but none in the shadow group. Enabling and adding users to the shadow group." Foreach ($User in $FilterGroupMembers) { Write-Host "Enabling: "$User.Name -ForegroundColor Green Process-User -User $User.objectGUID -Action Enable } Break # Kill script execution. We've enabled the users in the filter group. } # The only remaining logic is if both groups have members, in which case, we do a comparison. # Compare the memberships of the groups to understand what's different. $Comparison = Compare-Object -ReferenceObject ($FilterGroupMembers) -DifferenceObject ($FilterShadowGroupMembers) -PassThru If (!$Comparison) { Write-Warning "No differences detected between the groups. Nothing to do." } Else { Foreach ($User in $Comparison) { If ($User.SideIndicator -eq "=>") { # User is in the shadow group but not in the filter group so they # have been removed from the filter group since the last script # execution. # Process them by clearing any value from the $Attribute of their # user object and removing from the shadow group. Write-Host "Disabling: "$User.Name -ForegroundColor Yellow Process-User -User $User.objectGUID -Action Disable } If ($User.SideIndicator -eq "<=") { # User is in the filter group but not in the shadow group so they # have been added to the filter group since the last script execution. # Process them by adding $AttributeValue to $Attribute of their user # object and adding them to the shadow group. Write-Host "Enabling: "$User.Name -ForegroundColor Green Process-User -User $User.objectGUID -Action Enable } } } |
I’ll leave things in the same state they were when I finished the post yesterday. Daniel Peplow didn’t have the Office location of Cloud so he was deleted from Azure AD.
- As per the script, I created two groups: Azure-Users and Azure-Users-Shadow. Despite the CAPS warning, it doesn’t really matter if users are added or even removed from the shadow group. If removed from the Azure-Users-Shadow group, and they’re still in the Azure-Users group, they’ll just be re-added to Azure-Users-Shadow and have their filtering attribute set again – no great deal.

- The only eventuality not covered by the script is if the user is removed from both groups at the same time. If that happens, the script won’t know it needs to do anything to the user account since it doesn’t exist in either group. To avoid this scenario, you could set security on the group to prevent editing by low level admins, use a random name, place it in a different OU or just tell your admins to leave groups called Shadow alone. I think I prefer the security option but make sure the user executing the script does have permission to edit membership.
Scenarios
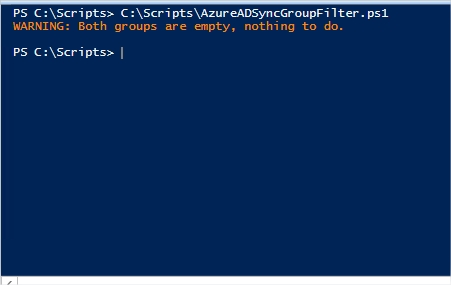
No users in either group
Likely to be the scenario after you’ve first created the groups.
Users in the shadow group, no users in the filter group
Likely to be the scenario if all users were removed from the filter group. NB: For this scenario, I added a couple of users to the shadow group manually.

Users in the filter group, no users in the shadow group
Likely to be the scenario after you’ve added your first user(s) to the filter group in order to set their attribute.

Users in both groups are synchronised
Likely to be the scenario if you have previously executed the script and there are no changes made to the filter (or shadow) group since the last execution.

Add users to the filter group
You are simply adding a user or multiple users to the filter group.

Remove users from the filter group

Adding and removing users in the filter group
You’ve both added users to and removed users from the filter group at the same time.

Err: User incorrectly removed from the shadow group
If an admin incorrectly removes a user from the shadow group. As you can see earlier in the executions, this user (Lewis Roberts) was already enabled, in this scenario, they’re simply re-enabled again.

Err: User removed from both groups
As mentioned, this is the only scenario where the script cannot do anything because it isn’t aware of the changes made. As a result, the user Daniel Peplow will have retained the Office location of Cloud and essentially be outside of the control of the script. It is certainly possible to create another script to audit your users but if you have a large directory, that might take a while. As I said, the best solution is to prevent lower-level admins from tinkering with membership of the shadow group using security.

As we can see, the flow of the changes I made are reflected by the users’ Office location values. The only issue of course is Daniel Peplow because his user object was removed from both groups simultaneously.

To fix Daniel Peplow, I just need to put the account back in the shadow group. It will be treated as a removal from the filter group and processed as such. If of course the user should be in the filter group (enabled) just add it and it will be processed and enabled at the next script execution.

Give it a try and see how you feel about using it. If you actually remove the attribute setting stuff, it works as pretty robust AD Group Synchronisation script too.
-Lewis




Awesome article Lewis. Helped me out heaps.
Quick question, Did you create the Task Scheduler ? I don’t appear to have it on my server.
Hi Scott, sorry for the delayed reply. No I didn’t. The Task is (or rather, should be) automatically created when you installed Azure AD Connect.
Very cool info, thanks for taking the time to publish.
Nice !!, Need a help we need to sync only a security group which is created on ad on premise..