Getting started with Azure Active Directory Sync Part 3
Part 3: Getting started with Azure Active Directory Sync – Mopping up
Part 1: Getting started with Azure Active Directory Sync – Tools
Part 2: Getting started with Azure Active Directory Sync – Actually doing it
So, after completing the last mammoth post, we now have synchronisation working (for the most part) but we do have one user called Outside Azure that has picked up the default Azure AD domain suffix, which isn’t what we want, so we’ll explore a couple of ways of remedying this.
During the set up process, we also created a couple of user accounts; one on each of our on-premises AD and Azure AD. Both are the accounts involved in the synchronisation process. Now, best practice suggests we should change the passwords every 30 days but the reality is; we live in the real world. I’d like to think we all enjoy the luxury of waiting for our passwords to expire so we can reset them to keep our systems safe from information disclosure but most of us will likely want to know how to prevent these passwords expiring. This isn’t recommended per se but I’m going to tell you how to do it nonetheless.
Fixing the user with the wrong domain suffix
So, you’ll recall that our Outside Azure user was created with the default Azure AD domain suffix ([something].onmicrosoft.com) which is incorrect. There are two ways of resolving this. One is ultra-simple; the other involves using Azure AD PowerShell commands.
- Option 1: Just give the guy an appropriate mail attribute. (Srsly?!) – Yes, seriously, just fix it in AD and at the next sync, it’ll remedy itself.

Will result in this:
- Option 2: Use Azure AD PowerShell.
-
Make sure you’ve installed all of the pre-requisites listed in Part 1 of this series.
- PowerShell 4.0
- Sign-In Assistant for Online Services (If you’re installing on the same computer as the AD Sync Services Tool, you already have this)
- Azure PowerShell (install via Web Platform Installer)
- Azure AD PowerShell Module (as of writing, the latest stable version is 8262.2, 8362.1 had an issue).
- Open up Windows Azure Active Directory for Windows PowerShell from the desktop (if you let the icon be installed there) or your Start Menu.

- Type in the following command:
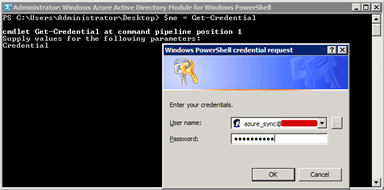
$me = Get-Credential
and press enter. You’ll be prompted for some credentials. Provide an account with Global Administrator privileges in your Azure AD.

- Now type in the command
Connect-MsolService -Credential $me
to connect to the Azure AD. If it goes well, you’ll be returned to the command prompt with no feedback. If you get a mess of red errors, ensure you have all the pre-requisites above installed. Consider if your proxy might be affecting comms with Azure AD.

- To check you can talk to Azure AD, type in the command
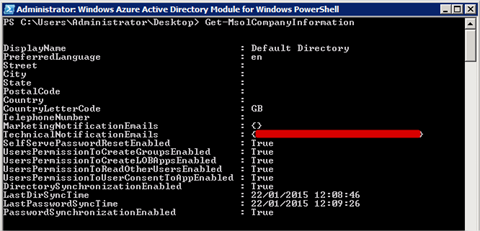
Get-MsolCompanyInformation
and you should get back something like the following.

- Sending the command
Get-MsolUser
will give you a list of the users currently synchronised with Azure AD.

- Now we’ll set the UserPrincipalName for our Outside Azure account using the following syntax:
Set-MsolUserPrincipalName -UserPrincipalName [CurrentUPN] -NewUserPrincipalName [NewUPN]
Once we press enter, we get nothing back if the change was successful.

- As you can see, the user gets updated in the Azure AD portal.

- You’re probably thinking: Won’t the next sync make a mess of this setting? Nope, give it a try.
You could, arguably, just blindly wade through Azure AD Sync Service setup and then manually complete the above process on each user account. I’ve never tried it but a well thought out Get-MsolUser piped to Set-MsolUserPrincipalName would probably work well for a lot of accounts. It’s highly likely someone has already created a script to do just that to be honest.
Disabling password expiry on the Azure AD account
Our synchronisation account on Azure Active Directory has an expiring password. To stop this password from expiring and potentially causing synchronisation delays/errors, here’s the process to disable password expiration on that account. I expect you know how to do this for your on-premises (adds_sync@) user so I’m not going to tell you how to do that.
- In a repeat of steps 4, 5 and 6 above:
Open up Windows Azure Active Directory for Windows PowerShell from the desktop (if you let the icon be installed there) or your Start Menu.
- Type in the following command:
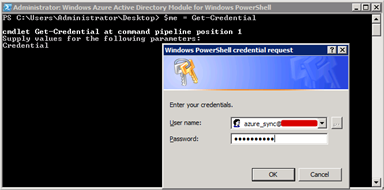
$me = Get-Credential
and press enter. You’ll be prompted for some credentials. Provide an account with Global Administrator privileges in your Azure AD.

- Now type in the command
Connect-MsolService -Credential $me
to connect to the Azure AD. If it goes well, you’ll be returned to the command prompt with no feedback. If you get a mess of red errors, ensure you have all the pre-requisites above installed. Consider if your proxy might be affecting comms with Azure AD.

- Now enter the following command, adjusting the name of your UserPrincipalName to the one that’s in your directory.
Set-MsolUser -UserPrincipalName azure_sync@[AzureAD].onmicrosoft.com -PasswordNeverExpires $true

- To check that the setting took, the following command can be used.
Get-MsolUser -UserPrincipalName azure_sync@[AzureAD].onmicrosoft.com | Select UserPrincipalName, PasswordNeverExpires

That completes this three part series. I hope it has been a good introduction and that everything you wanted to understand about Azure AD Sync is a little clearer. You may or may not have noticed that I haven’t delved deeply in to Groups sync with Azure AD, that’s basically because if you select an OU that contains a group, it’ll be synchronised to Azure AD. If members of that group are also synced, they will be in the synchronised group. There’s really not that much else to it.
Best of luck with your Azure AD Synchronisations!
-Lewis


